|
|
Thanks! Your encouragement will keep me coming back 
|
|
|
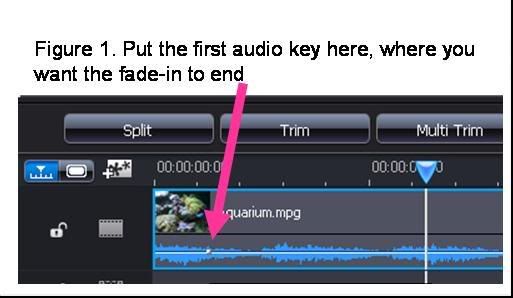
What happens during the preview? Do you hear the audio at all? Sometimes I have trouble making the audio fade-in work. So instead of doing a fade-in through the audio mixing room, do it manually in the timeline as follows:
Make sure the "show sound waveform in Timeline" is enabled (Edit-Preferences-General)
Work in the timeline view. You may need to magnify the timeline to see what you are doing.
Click to add a volume key to the audio level line (see figure 1), where you want the fade-in to stop
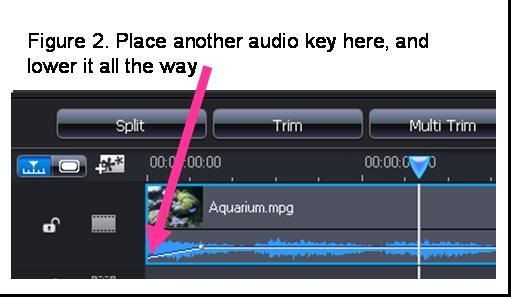
Click to add an audio key to the audio line at the beginning, and lower it all the way down to mute the sound (see figure 2)
Regards,
Elisabeth
|
|
|
Robert,
Some DVD players only read DVD-R or DVD+R. So yes, your disk could work in some players but not others.
Sometimes the menus do not work on stand alone players, even though the disk works fine in your computer (you can see the buttons but not the highlights or you have to navigate blind through the menu). You can search the forums here for some menu button highlight workarounds.
When I produce a movie, I use PD to "create a DVD folder". I then use Nero to burn the created folders to a DVD. A 1 hour movie takes about 4 minutes to burn (15x). I'm satistifed that the disk works well if:
- The disk plays back on my computer using WindowsMedia Player (often does not)
- The disk plays back on my computer using PowerDVD (almost always)
- The disk plays back on my stand alone Sony DVD player.
You could try producing and burning a really short movie to work out any bugs in your set-up.
Good luck,
Elisabeth
|
|
|
|
Thanks for the encouragement. Hopefully no baby for another 5 weeks. It's still in "editing" stage.
|
|
|
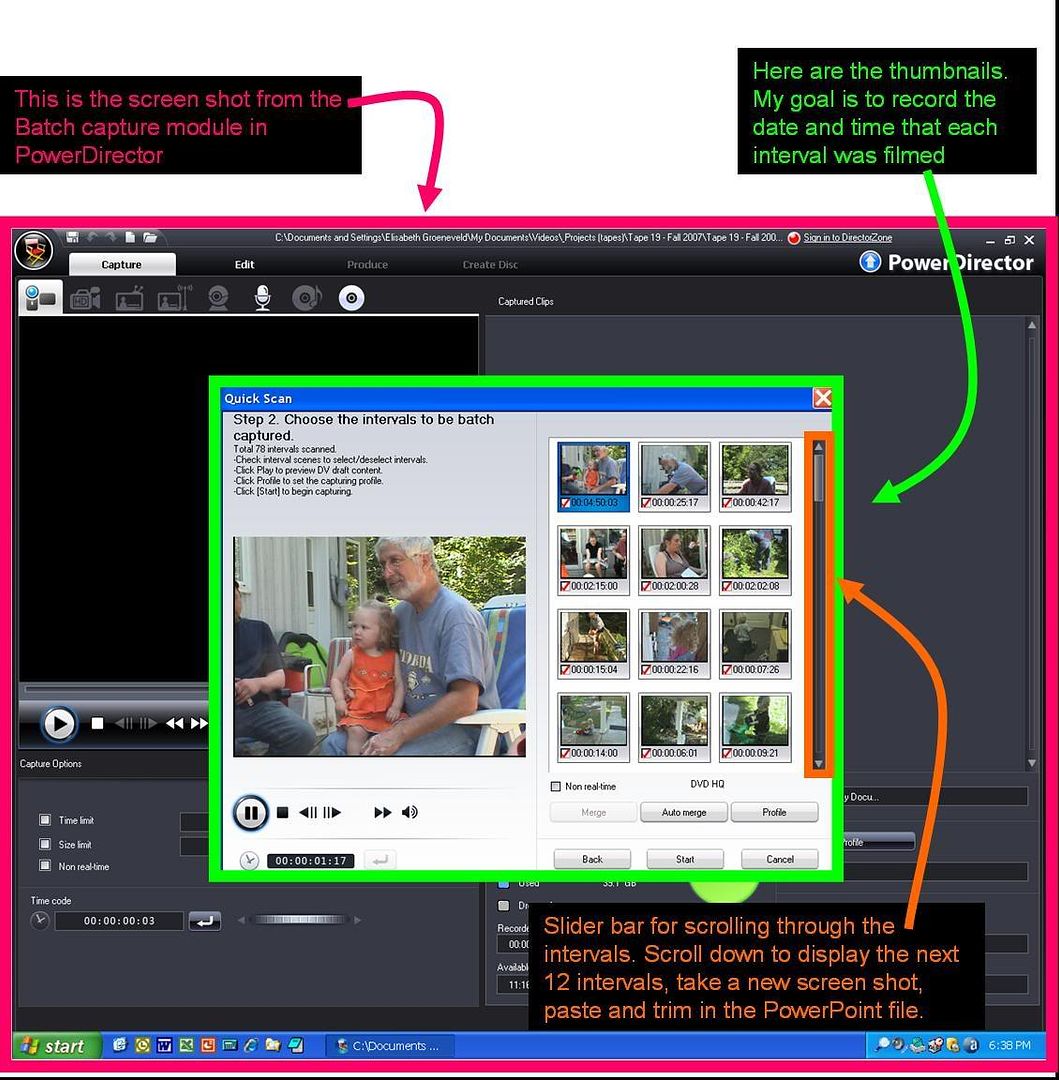
Here is how I record the date and time of each captured interval of my DV tapes using PowerDirector:
Step 1) Select automatic batch capture in PowerDirector. Scan the tape and generate intervals. Each interval will show up as a thumbnail.
Step 2) Copy the thumbnail images using the “Print screen” keyboard shortcut, then paste into a PowerPoint file (or other image editing software of your choice).
Step 3) In PowerPoint, trim the excess screen shot leaving only the thumbnails (see the second photo for the end result). Repeat for each page of interval thumbnails: use the slider bar to scroll down through the intervals.
Step 4) In PowerDirector, hold the mouse over each interval thumbnail. The date/time information will briefly appear. Record this information in the PowerPoint file. See page 2 for the final product.
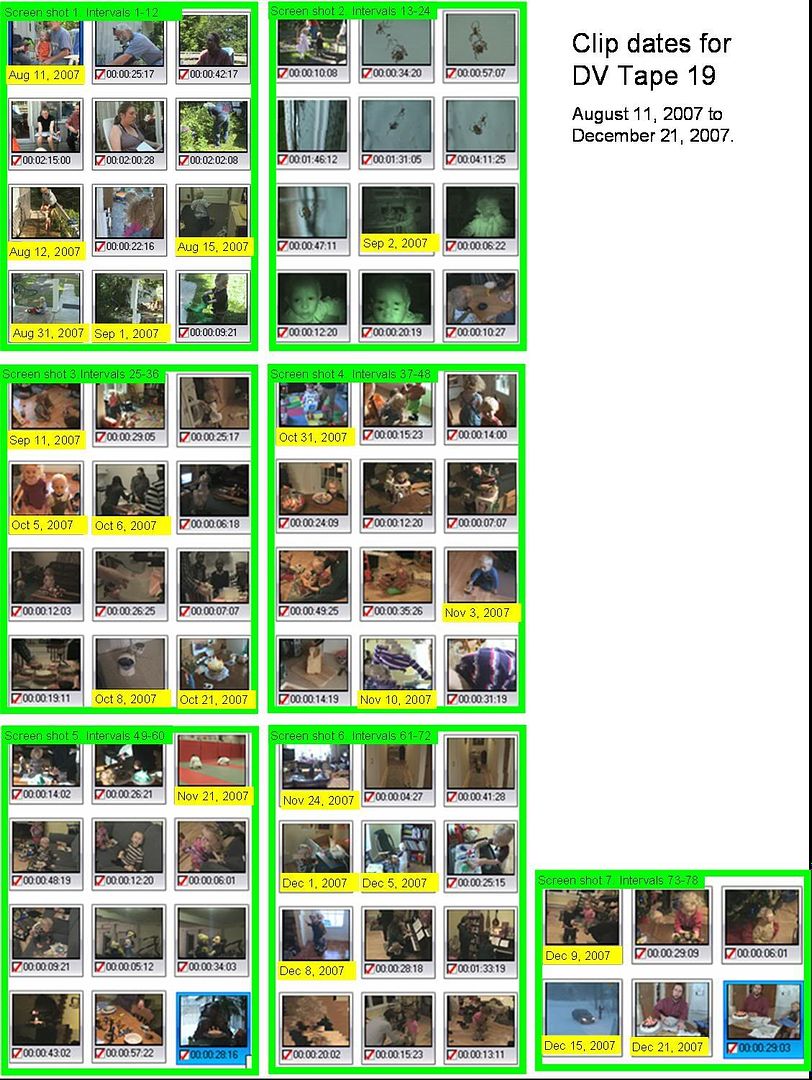
Step 5) As I edit the footage in PowerDirector, I insert the date information into my movie using titles over a black colour board.
Note: I know, this is long, pedestrian and not terribly slick. But it always works, and only has to be done once for each tape.
Here is an example of a file that I created with all the clips dates recorded on it. I printed this file and used it as a reference while I edited the footage from DV Tape 19.
|
|
|
I've been on bedrest for the last 16 weeks with a "challenging" pregnancy. For the first time (and hopefully last) time in my life I have time to fiddle around with PowerDirector, and thought that maybe I could save other users the tears of frustration. My recents posts reflect dozens of hours of PowerDirector use over the last few months.  I've finally finished editing all my home movies! I've finally finished editing all my home movies!
|
|
|
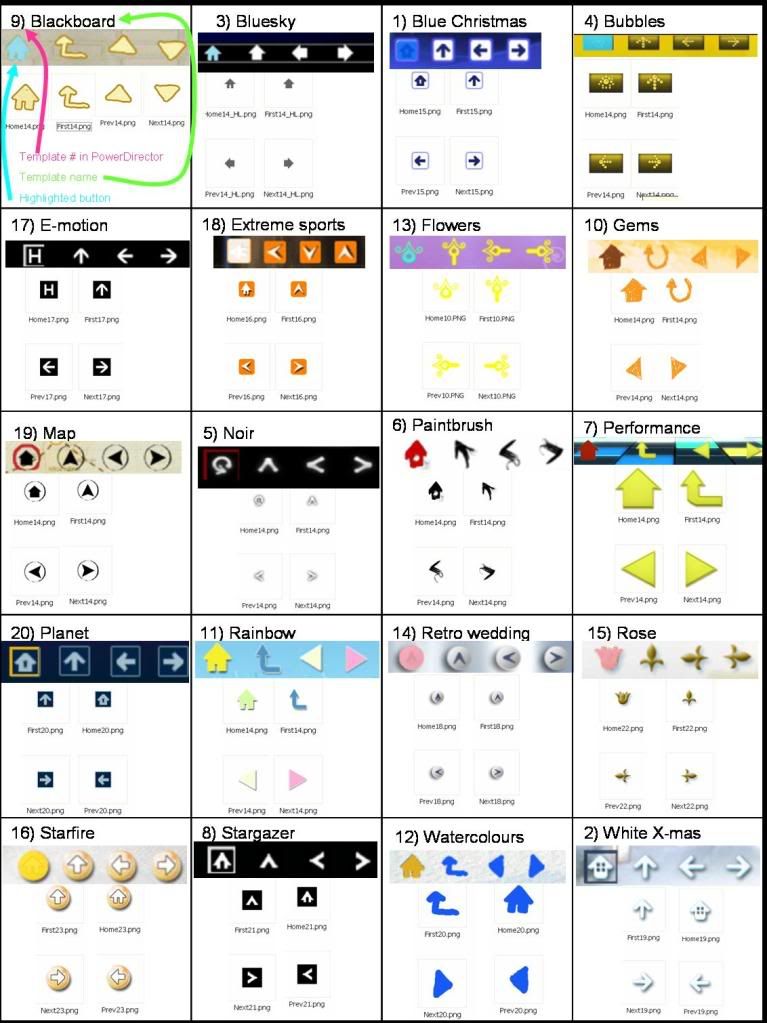
Here is the image file showing the sets of nagivation buttons from the 20 templates. They are listed in alphabetical order.
|
|
|
PowerDirector supplies 13 sets of navigation buttons in the Menu designer. You can also import the navigation button from the 20 menu templates when creating your own menu from scratch. This gives you a total of 33 navigation button sets to choose from.
Each of the 20 basic menu templates is stored on your hard drive under the following folder names:
- Blue Xmas (Template 1)
- White Christmas (Template 2)
- Blue sky (Template 3)
- Bubbles (Template 4)
- Noir (Template 5)
- Paintbrush (Template 6)
- Performance (Template 7)
- Stargazer (Template 8)
- Blackboard (Template 9)
- Gems (Template 10)
- Rainbow (Template 11)
- Watercolors (Template 12)
- Flowers (Template 13)
- Retro wedding (Template 14)
- Rose (Template 15)
- Starfire (Template 16)
- E-motion (Template 17)
- Extreme Sports (Template 18)
- Map (Template 19)
- Planet (Template 20)
On my computer, the template menus are located in the following directory: C:\Program Files\CyberLink\PowerDirector\Menus\
For example, if you want to use the navigation buttons from Template 13 – Flowers, proceed as follows:
1) In the create disk module, click “New” to edit open the Menu designer and edit a new template
2) Click on “Set button effects” icon
3) Click on "Change navigation buttons" icon
4) The 4 currently used navigation buttons are shown under the “Current buttons”. Click on the “Home” button to highlight it.
5) Click “Import custom"
6) Browse to find the "pcbg" folder of the Flowers menu. The path on my computer is:
C:\Program Files\CyberLink\PowerDirector\Menus\Flowers\pcbg
7) Select the file "Home10.png". Click "open". The Flowers Home button should now appear on your menu.
8) Repeat these steps to import the other three navigation buttons: "First10.png", "Prev10.png" and "Next10.png"
9) Save the template and you're done!
I have created a file which shows the 20 sets of navigation buttons from the templates, as well as their highlight color. If you'd like a copy of this file, send me a PM.
|
|
|
I experience this problem frequently. I posted my list of workarounds in this thread:
http://forum.cyberlink.com/forum/posts/list/6776.page
|
|
|
|
If I can't get the create disk module to work properly in PowerDirector, I produce a single file, then create a DVD using this file PowerProducer.
|
|
|
I’ve edited 22 home movies using PowerDirector (6 movies using PowerDirector 7). I have problems with the audio going out of sync (the sound lags behind the video – it looks like a bad dubbing job) in about 75% of my projects. This problem has persisted in spite of upgrading computers, un-installing re-installing PowerDirector, applying all software patches. The audio sync problem is inexistent in the original AVI files that I work with. Here are all my workarounds, please add your own to this list...
GENERAL NOTES
- Stop and fix the problem as soon as it is noticed.
- I edit my movies in a linear fashion (from start to finish). This makes it easier to detect and fix audio sync problems as they arise.
- Audio sync problems are more likely in movies with more complex editing. Fixing the lighting and colour and adding transitions seems especially likely to cause problems.
- Un-installing, re-installing and applying patches for PowerDirector takes about 20 minutes. I do this at least once per movie.
- Opening and closing a file can trigger audio sync problems. The more times a file is opened, the worse the audio sync problem becomes.
- Large fragmented video files seem to cause more problems. I keep all my video files on a dedicated drive that I defragment frequently.
SITUATION 1: Audio goes out of sync after adding a specific transition between clips.
- WORKAROUND 1: Remove the offending transition.
SITUATION 2: Audio goes out of sync at a specific moment on the timeline, for example at 22'09" (no sync problems before this time, sync problem after this time).
- WORKAROUND 2A: Delete all clips AFTER 22’09” from the timeline. Re-import them to the timeline. If this doesn’t work, try the next step...
- WORKAROUND 2B: Delete all clips BEFORE 22,09” from the timeline. Undelete. If this doesn’t work, try the next step...
- WORKAROUND 2C: Produce the movie in two parts - Part 1 runs from 0'0" to 22'09". Import “Part 1” to the timeline. This may be enough to resync the rest of the audio. If the audio is still out of sync from 22’09”, try the next step...
- WORKAROUND 2D: Edit the remainder of the clips as a new project. Produce a file “Part 2”. Make sure the audio is in sync. Create a new project file. Import both “Part 1” and “Part 2” into the timeline. If this doesn’t work, try the next step...
- WORKAROUND 2E: Re-install PowerDirector. Open a new project. Import Part 1 and Part 2 to the timeline. If this still doesn’t work...
- WORKAROUND 2F: Start the project over from scratch. This really sucks.
SITUATION 3: Modifying the colour/lighting makes the audio go out of sync.
- WORKAROUND 3: Re-install PowerDirector
SITUATION 4: Audio suddenly goes out of sync when you open the file/insert chapter points/burn the file/produce the file/make a minor modification/open a hitherto perfect project
- WORKAROUND 4: Save the project with a different name every time (e.g. Project_1, Project_2, Project_3). At the very least, a different file name for every 15 minutes of timeline, before you add the chapter points, before modifying the menu, before producing the final file. If the audio suddenly goes out of sync, re-install PowerDirector, then open one of the last known good version of your project.
SITUATION 5: You notice an audio sync problem after the entire project is completed and you’ve produced the final file.
- WORKAROUND 5 (The brute force method): Open a blank project. Import the file to the timeline. Extract the audio. Mute the audio on the clip. Drag the extracted audio to the audio track. Manually sync the audio to the video.
SITUATION 6: Nothing works.
- WORKAROUND 6: Buy a different software. I’m only sort of joking. I like the features and the price, but I lose countless hours with every movie simply debugging. For every hour movie editing, I spend about 20-30 minutes debugging.
MY COMPUTER INFORMATION
Processor: AMD Athlon 64X2 Dual core 3800+ 2.01 GHz, 2.93 GB of RAM
Video card: NVDIA GeForce 6100
Sound card: Realtek High Definition Audio
Microsoft Windows XP home edition, Version 2002. Service Pack 3.
|