|
|
Quote:
mikecox
I use the method of dragging and I think quite easy to fit the clip where I want, expanding the timeline is quite easy.
The clip fits the self join, start or end of the clip.
If you want to drag first and then fit, drag to another track and then set the drag to the right place.
Note: If you click on a clip and STOP the CTI goes to the beginning of this clip, need a way to insert new clip in the exact position.
Not sure I understand completely, but it sounds like what your saying is that if I expand the timeline the snap option will work better.
I installed PD on my laptop because it is more powerful than my desktop, but I am using a pen tablet on that machine. Maybe that is part of the problem. The new track ball; which is what I have on my other computer, arrived today so I'm going to switch to that and see if the snap problem improves.
|
|
|
Quote:
Quote:
I am frustrated by the options in the "insert on selected track" menu; when the CTI isn't at the end of the timeline.
I wish there was an option to put the selected clips at the end of the current timeline; because when you move a clip to the timeline the CTI remains where it was when you inserted the clip;it doesn't move to the end of the timeline. That means when you try to add another clip; with the "insert..." option, the drop down appears and offers options to put it where the CTI is; but doesn't offer to put it at the end of the timeline. So every time I insert a clip I have to move the CTI to the end of the timeline, so the next clip will go there when I click "Insert..."
I use click and drag to place a clip on any track - have you used that method?
Yes, but the "snap" feature is very sensitive; so if I don't sneak up on the CTI and, very gently, nudge the clip into place it overshoots and overlays; and deliver the drop down; which does not include an option to "snap to clip", or allow me to back away and try again.
So I end up having to let go of the clip and starting over; a frustrating and time consuming process, especially if your moving a lot of clips and keeping missing the snap. That's why I prefer the "insert..." option; I just have to remember to move the CTI to the end of the clip; if that's where I want the new clip.
I suppose I could always drop the clip then highlight the gap and delete it; that would cause the clip to, effectively, snap when the gap closed.
btw I've never seen a "DROP" key on a computer keyboard. How do you use the shortcut keys in the "insert..." drop down?
EDIT: I just figured out "DROP"; it isn't a key, it means "drop", and in hold down the Ctrl while you drop it item.
|
|
|
I am frustrated by the options in the "insert on selected track" menu; when the CTI isn't at the end of the timeline.
I wish there was an option to put the selected clips at the end of the current timeline; because when you move a clip to the timeline the CTI remains where it was when you inserted the clip;it doesn't move to the end of the timeline. That means when you try to add another clip; with the "insert..." option, the drop down appears and offers options to put it where the CTI is; but doesn't offer to put it at the end of the timeline. So every time I insert a clip I have to move the CTI to the end of the timeline, so the next clip will go there when I click "Insert..."
|
|
|
Quote:
Michael -
It sounds like you're getting on top of it! ![]()
Cheers - Tony
Indeed; it's all upside down!
I just purchased Steve Grisettti's new book:
The Muvipix.com Guide to CyberLink PowerDirector 12 Ultimate: The fun, easy, powerful way to make great-looking movies on your personal computer.
Maybe that will help get me up and running.
btw, I clicked the link in your sig and bookmarked the page with all the tutorials. Thanks for putting that there; very helpful!
|
|
|
Hi Tony,
Quote:
The screen capture in the WMV was done using Camtasia Studio, but there is plenty of free capture software available. The order of these links is no indicator of quality or recommendations:
Thanks for the links; I will check them out and try to decide on one.
I learned something here recently; about the video stack. In Premiere Elements video 1 is on top, in PD video 1 is on the bottom. Now that I have sorted out maybe I'll have better luck setting of my effects.
|
|
|
|
Quote:
You mean visually that fact that the indicator increments about 6 frames is visually unappealing?
Jeff
Yes, it gives me the jitters; watching the CTI jump along the timeline, instead of move smoothing and quietly.
As I said, you couldn't see it properly if it was counting correctly vs the about 6 frame increment.
I understand what your saying, you don't see it in the video; but you can see it on the timeline.
If you want to see every frame, the period hotkey "." will toggle one frame at a time, or you can advance one frame with the arrows in the preview window.
Thanks for the "." tip; I didn't know. I usually use the arrow keys.
|
|
|
Quote:
Quote:
Am I missing something, based on what you said here I can't figure out why I'm getting this result?
both these images are the same size, yet the image in video 2 shows on the monitor, even though there is a clip over it, in video 1.
The video tracks are numbered, see the number way to the left of your pic on the video track. Video track 2 will always display on top of video track 1 in your finished product, physical its located beneath track 1 on your timeline edit screen. So your pic is correct, the video track 2 is always on top (display wise) video track 1.
Think of the video tracks as a deck of cards, I have cards 3, 2, 1 (video tracks) all stacked up and the 3 is facing me. I can't see cards 2 or 1.
I could cut the 3 card in half (video edit) then I'd see half of card 2 but still not card 1.
I could make the 3 card transparent (video edit) then I'd see all of card 2 but not card 1.
I could cut the 3 card in half (video edit), and cut the top of card 2 off, then I'd see pieces of cards 3, 2, and 1
Jeff
Well done Jeff. It's very clear to me now.
Premiere Elements arranges video tracks exactly opposite; with track 1 on top. It's what I expected so it confused me.
|
|
|
|
Thanks for hanging in there with me on the question Tony
Quote:
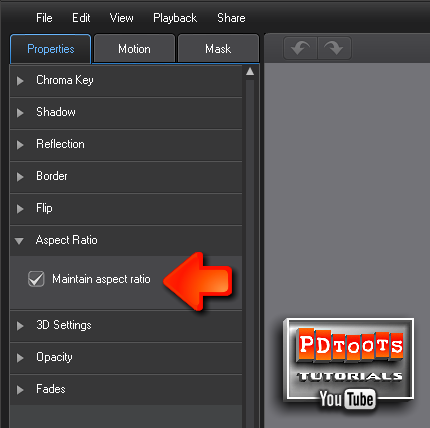
See if this screen capture helps. It shows how to reshape only one dimension at a time.
That's a great clip! I will have to study it more carefully, which I will do after posting this. But let me ask you another question; how did you record that? If I could do that I could record the steps I'm having trouble with; and send it to you.
It may not be clear enough in this format. Just say.
I get to the part where I un-check the aspect ratio. It is at this point; where I try to drag the top of the crop down, using keyframes to set the wipe, that it appears that the aspect radio is still checked!
Importantly, after you've unchecked "Maintain Aspect Ratio" use only the central handles to resize.
Yes, that's what I'm grabbing.
I will return to the editor and see if I can make it happen again.
Part of the problem it that I am so disoriented; because I'm used to Adobe's Premiere Elements UI! I may be missing something that is very obvious but just can't see it.
|
|
|
|
Quote:
Are you referring to the 00:00:00:00 timecode, keep in mind the :00 at the right end is frames, Hr:Mn:Sec:Frames. It's really expected to do that and you couldn't see if it was showing every frame anyhow. The human eye, brain, and visual system, can process about 10 images per second and perceive them as an individual image, that counter is moving at ~30 images (increments) a second for NTSC. Watch the seconds, that should be smooth and you can processes that.
Jeff
Ok, that makes sense; but it makes the process feel clunky. Again, I'm coming from Adobe's PrE; where the CTI doesn't jump along the timeline but moves smoothing along it.
I hope you don't think I'm complaining, I'm not. PD12 got some "rave reviews" so I thought I'd check it out.
I'm simply comparing editors to see if PD12 might be a better option for me. At this stage I'm just exploring the basics and trying to duplicate some "tricks" I've tried in PrE; to see which editor is more intuitive. I'm also comparing features. I will be studying the PDF manual and probably be asking a lot more questions.
So far I am impressed by the timely support I've received here; it compares well with the great forum support for PrE.
|
|
|
Thanks for your response Jeff
Quote:
Yes, the higher numbered track always lay on top of the lower number tracks.
Am I missing something, based on what you said here I can't figure out why I'm getting this result?
both these images are the same size, yet the image in video 2 shows on the monitor, even though there is a clip over it, in video 1.

If you have a video on track 1, and a full screen video on track 2, all you will see is the video in track 2.
To clarify this issue I switched the clips; and the clip on track 2 still appeared on the monitor when the CTI encounter it.
Be careful of the playback setting of "Clip" or "Movie". Clip only shows clip regardless of track, movie shows assembly of all tracks.
I clicked each of these options and it didn't change what I saw on the monitor
these are in the higher numbered tracks so the lay on top
Ok, so if I have a clip on track 1 and I add a clip to track 2; below it, track 2 will overlay track 1?
That's exactly opposite of what I'm used to. In Adobe's Premiere Elements track 1 is always on top of the higher numbered tracks below it. Just as in Photoshop, where a full screen layer on the top of the layered images covers the ones below it; that's why it seems counter intuitive to me.
|
|
|
|
I am frustrated by how the timeline moves the a clip is played. I'm using the default settings and I've noticed that the CTI "current time indicator" jumps Instead of moving smoothly across the timeline, like the second hand on a clock that jumps to the next second. Is that normal?
|
|
|
In Adobe's PrE 12 if there are 2 clips on the timeline; one above the other, the one that is will be seen in the editor is the one on top.
I am looking at the same setup in PD12, but the video I'm seeing is the one on the bottom.
I'm having a real hard time with this; I can hardly believe my eyes, so I test it. I moved Video 2 down the track, so there is nothing under to top track, then hit play. Sure enough, the top clip played until the timeline got the bottom clip; at which point the top clip disappeared and the bottom clip displayed.
That seems very counter intuitive; logically you would expect to see the top clip, cover the bottom clip.
|
|
|
Ok, this is a very different approach to the one I am using; in which you cut the clip and separating them, then use a "wipe" transition.
Since I'm new to PD12 I will need to experiment with the method; which actually appear simpler than the method I'm using in Premiere Elements.
But I still need to learn how I can crop a clip then drag to top down; without affecting the sides and bottom of the clip; without it getting smaller.
|
|
|
|
Quote:
Hi Michael -
I think I may have been put off the scent by the terminology you've been using. I don't think your question has much to do with cropping, but I could still easily be wrong.
Is all you want to do animate the red line? A bit like the attached example?
Cheers - Tony
Yes, that's exactly what I'm trying to do. I expect using the term "freeform" was what threw you off. I Photoshop freeform offers many options but what is doesn't do is constrain things; you can' move a top or side without affecting the others.
|
|
|
Hi Tony, thanks for trying to sort this out for me. I think the 2nd one fits the best.
Let me try to explain what I'm trying to do.
I want to create a moving line that moves north; from point B to point A;
I have two clip that are exact copies on one another.
I put one on video 1 and the other on video 2
I have added a red line to the clip on video 2, that starts at Point B; in the middle of the clip, and ends at point A; at the top of the clip.
I have cropped clip 2 from point A to point B; blocking out the top half of the clip; the part with the red line. What you are actually seeing at this point is the bottom half of clip 2 and the top half of clip 1. But because they are exact copies it look like a single image.
Now, if I drag the crop in clip 2 up; from point B to point A, more of image 2 is revealed and it appears as though the red line is moving.
At this point I have managed to create the crop, but I can't unrestrain it. When I drag the middle handle, at point B, and drag it up the sides come in. Where is the option the frees the constraints, so when I move the bottom of the crop only the bottom moves?
|
|
|
|
Quote:
Hi Michael -
I shouldn't really chime in because when you have Cranston on your case you're in the best hands in the business!
I'm sure he doesn't mind; I certainly don't ![]()
are you working in Power Tools > Video Crop or PiP Designer? It sounds like the latter, but I just wanted to confirm.
I'm not in PiP; but I'm guessing I'm not in Video Crop either, or I wouldn't be getting the freeform feature results.
I'm simply trying to animate the crop in the video on track one. I want it to start uncroped; then I want the crop to get smaller and smaller as the timeline moves to the end of the clip.
What is happening now is that the keyframe is working but the image gets crushed and the crop size changes. I realize that's a "freeform" feature and I just want to adjust the size of the crop.
I selected "clip", then hit F2 and unchecked the aspect ratio option. Where do I go from here; the change the size of the crop?
|
|
|
Quote:
Quote:
I can't get this freeform keyframe to allow for just to top of the crop to come down; leaving the side where they are.
Have you tried removing the checkmark from the Maintain Aspect Ratio option in PIP Designer?
Thanks for your reply. I've watched, and subscribed, to the YouTube clips and they were very helpful but they didn't quite address what I'm trying to do.
I think I was using the wrong terminology; when I said "freeform" I meant I didn't want the crop to be constrained. Unclicking the Aspect Ratio did address that issue; now I know where it is ![]()
Now the problem is that I want to keyframe the crop so that it starts at one point and gradually sized down to minimum; so the clip under the cropped clip is brought into view. The top clip has a red line in it and I'm trying to make the red line appear to be moving down the screen.
So now what is happening is when I grab the center handle at the top and drag it down the image gets squashed. I think that's a freeform effect; and I want a crop effect, I don't want to distort the image.
|
|
|
|
I am trying to keyframe a crop. I have added the crop; using freeform. I then hit F2 and add a keyframe to Freeform. Then I grabbed the top middle handle and dragged it down; but the sides came in at the same time. I can't get this freeform keyframe to allow for just to top of the crop to come down; leaving the side where they are.
|